Master Remote IoT: SSH, Monitoring & Control!
In an era defined by interconnected devices, have you ever considered how to truly master the art of remote device management? The ability to remotely control and monitor your Internet of Things (IoT) devices is no longer a futuristic concept; it's a present-day necessity.
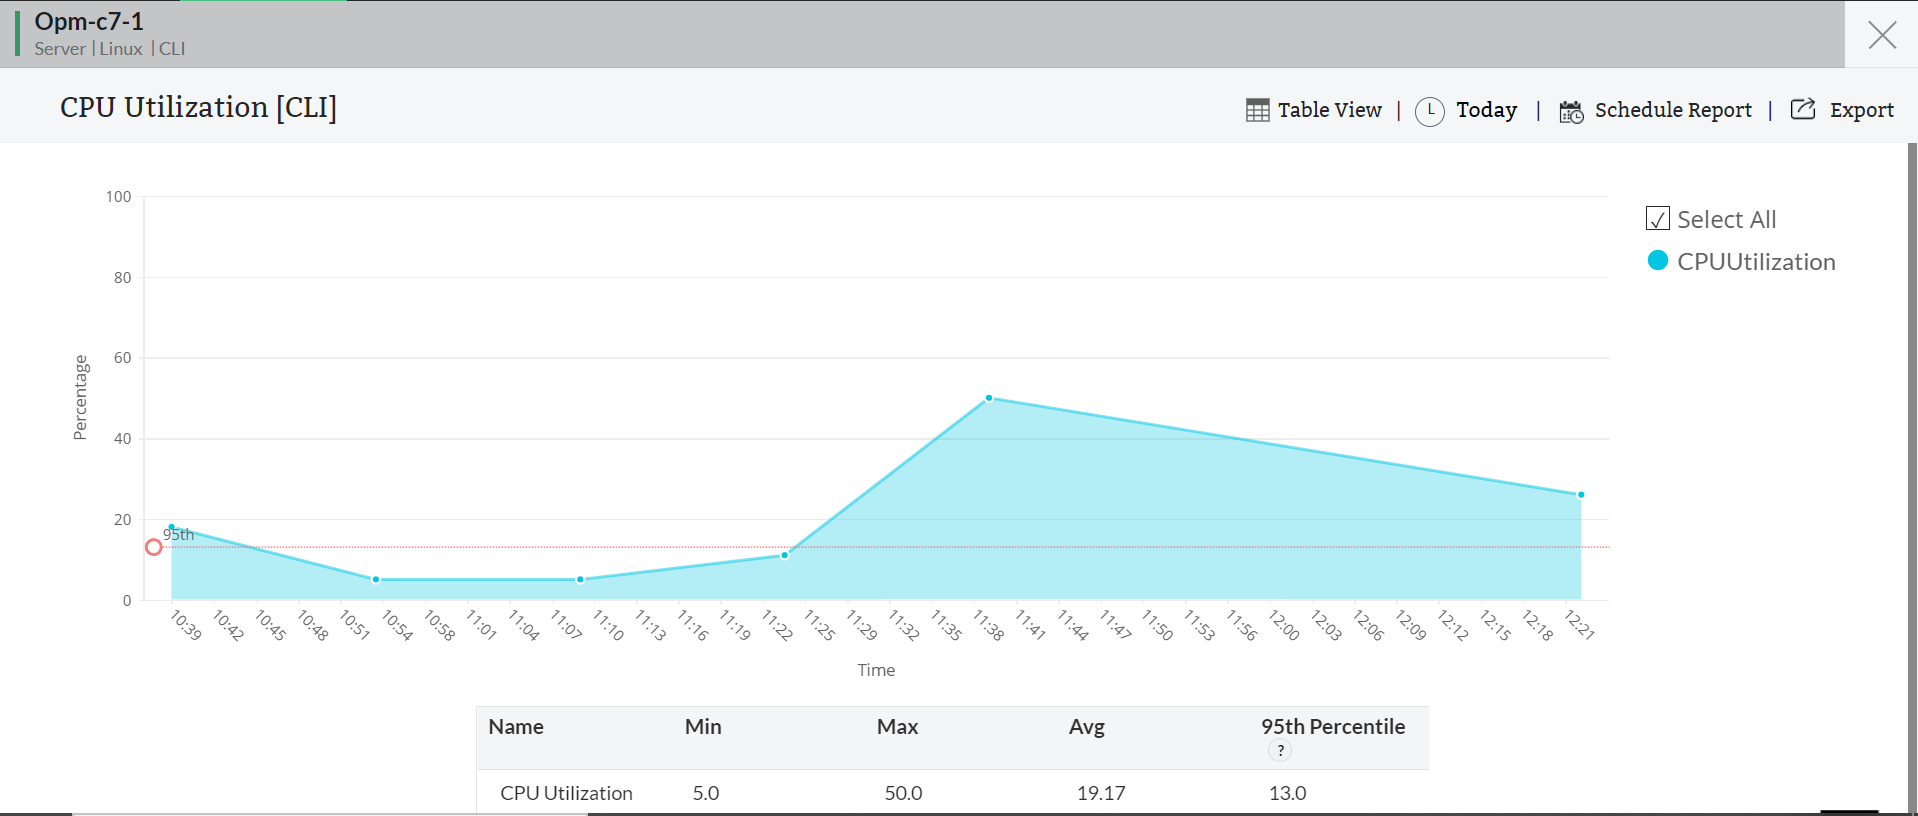
Imagine a world where you can oversee and manage all of your IoT devices from a single, unified dashboard. Visualize the capacity to remotely monitor crucial metrics such as CPU usage, memory allocation, and network activity, all while receiving real-time alerts based on the data your devices generate. Envision the power to execute batch jobs across your devices with a single command, regardless of their physical location.
The backbone of this modern capability is secure remote access, and the Secure Shell (SSH) protocol stands as a stalwart in this domain. SSH is particularly useful for remote IoT monitoring, as it allows users to manage their Raspberry Pi and connected devices securely from anywhere in the world. This article serves as a comprehensive guide, delving into the intricacies of using SSH with IoT devices, providing practical insights and actionable tips for effective implementation. We will explore how SSH not only ensures secure communication but also simplifies the process of managing IoT devices from afar. Let's examine the benefits of remote SSH, remote access, remote connect, and remote monitoring of IoT devices. By understanding these principles, you can transform your approach to IoT management, increasing efficiency and control.
This is particularly important with the proliferation of smart homes, industrial automation, and environmental monitoring systems, understanding how to set up a secure connection on a Raspberry Pi is crucial for managing IoT devices remotely. This can be done using a variety of methods, such as SSH, VNC, and RDP. Remote access to an IoT can be useful for a variety of purposes, such as:
If your IoT is running a server or other critical application, you may want to be able to access it remotely to monitor its performance and troubleshoot any problems.
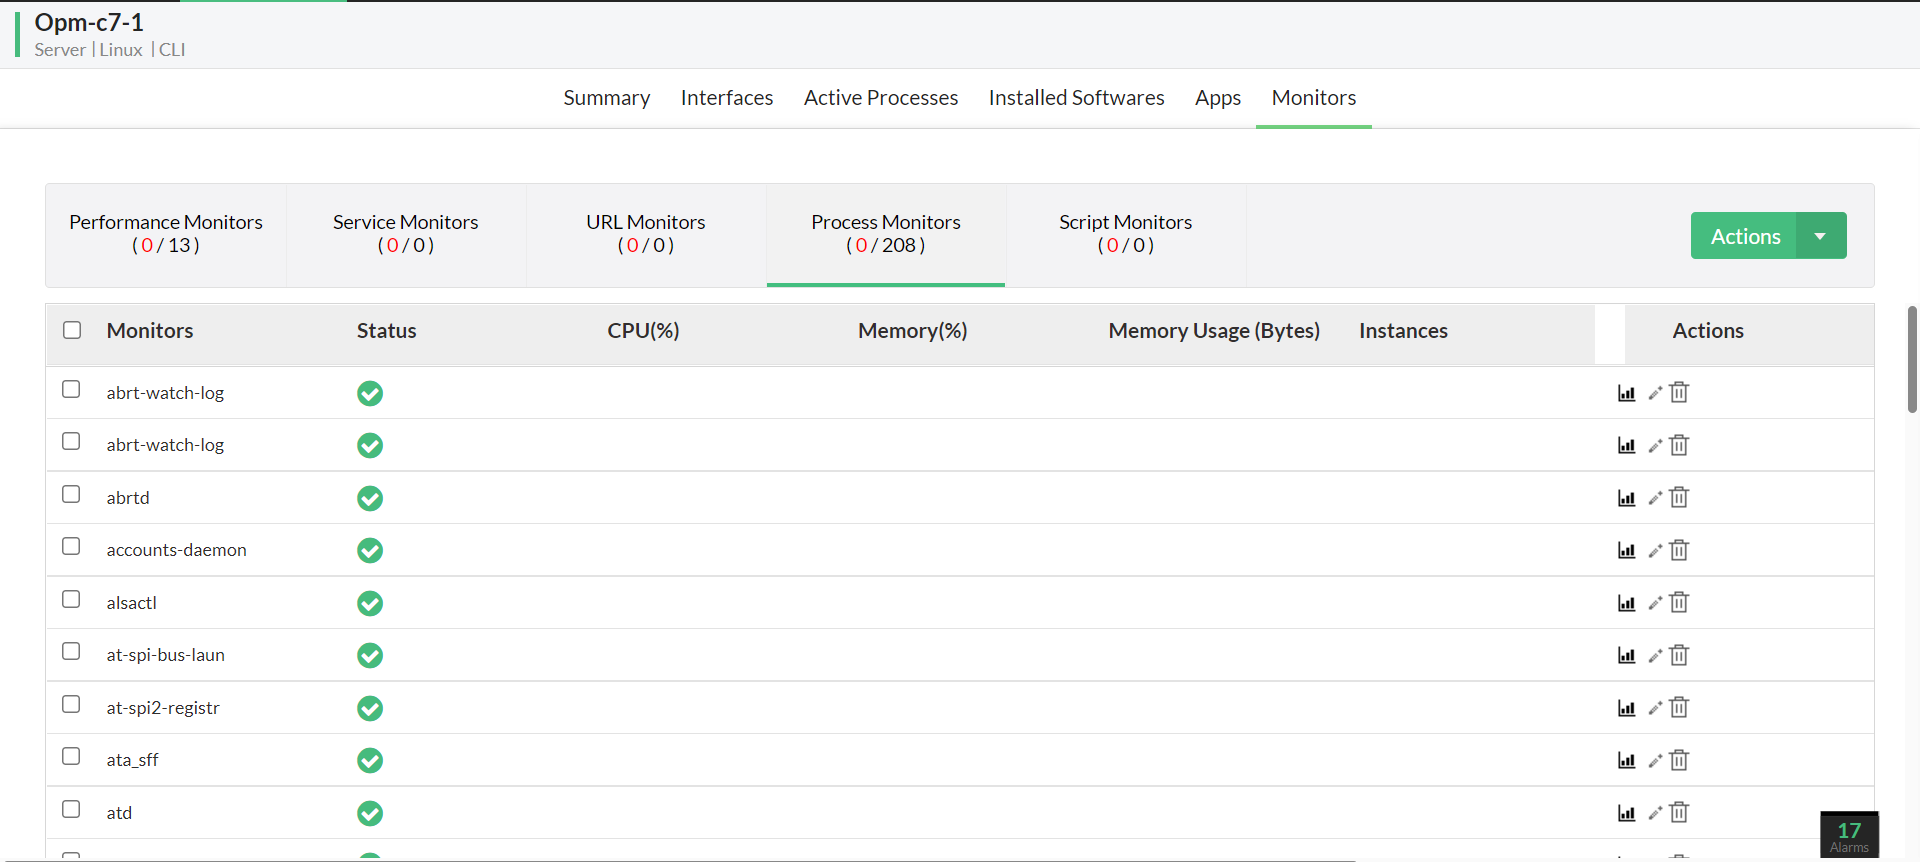
Remote IoT device management platforms help monitor and detect uptime, troubleshoot, and other problems persisting in your devices. Consider how remote IoT allows you to manage and connect Raspberry Pi or IoT devices securely from anywhere. You can connect to any device or machine behind firewalls.
The following table offers a structured view of the core concepts and benefits associated with remote IoT monitoring and control. It is designed to be easily inserted into platforms like WordPress, providing a clear and concise overview.
| Feature | Description | Benefits |
|---|---|---|
| Remote Monitoring | The ability to observe the status and performance of IoT devices from a distance. | Early detection of issues, proactive maintenance, reduced downtime. |
| Remote Control | The capability to interact with and manage IoT devices remotely. | Flexibility, ease of management, immediate response to device needs. |
| Secure Shell (SSH) | A cryptographic network protocol for secure remote operation. | Secure communication, access to command-line tools, remote file management. |
| Raspberry Pi | A low-cost, single-board computer often used as an IoT device. | Versatile platform for IoT applications, easy to set up and manage. |
| Alerting Systems | Real-time notifications based on IoT device data. | Immediate awareness of device issues, reduced response time. |
| Batch Job Execution | The ability to run commands or scripts across multiple devices simultaneously. | Efficiency, time-saving, simplified device management. |
| Unified Dashboard | A single interface for monitoring and controlling all IoT devices. | Simplified overview, improved control, efficient management. |
For more detailed information, please refer to the official documentation and guides available at Raspberry Pi Foundation.
Let's delve into the specifics. Remote IoT monitoring allows you to keep an eye on your IoT devices without being physically present. Think of it as having a pair of eyes and hands in multiple locations at once. SSH plays a crucial role in this setup, providing a secure channel to access and manage your Raspberry Pi remotely. By leveraging SSH on Raspberry Pi, you can perform tasks such as file transfers, remote command execution, and system monitoring without the need for physical access to the device.
Understanding the basics of remote IoT monitoring is the first step. This involves grasping the principles of data collection, remote access, and security protocols. Then there is the selection of the right tools and technologies. These could include platforms like SocketXP, mentioned previously, which can easily support vast numbers of devices. The gateway functionality, enabling scalability, is also key. With the rise of smart homes, industrial automation, and environmental monitoring systems, understanding how to set up a secure connection on a Raspberry Pi is crucial for managing IoT devices remotely. The choice of remote access methods, such as SSH, VNC, and RDP, is determined by specific requirements.
Remote access to an IoT device can be useful for a variety of purposes. If your IoT is running a server or other critical application, you may want to be able to access it remotely to monitor its performance and troubleshoot any problems. A remote IoT device management platform can help monitor and detect uptime, troubleshoot, and address other problems persisting in your devices.
What is remote IoT, and why should you choose it? Remote IoT allows you to manage and connect Raspberry Pi or IoT devices securely from anywhere. You can connect to any device or machine behind firewalls. The remote IoT web SSH client can access IoT devices from anywhere via a standard web browser. Follow the steps below to access your IoT or Raspberry Pi device from a browser. Download and install the remote IoT agent on your IoT device or Raspberry Pi device from the remote IoT portal, and you can sign up and log in to get your authentication. IoT device management helps businesses and consumers get the most of their connected devices, whether it's a driverless car or a smart city. By flicking on remotely SSH Raspberry Pi, anyone can handle important stuff like updates, monitoring, and tweaking settings, all without leaving their seat. Throughout this article, we will delve into the technical aspects of setting up remote IoT monitoring using SSH on a Raspberry Pi.
Combine remote control functionalities with monitoring capabilities. Get a complete overview of all your IoT devices in one single dashboard. Remotely monitor CPU, memory, and network usage, receive alerts based on monitored IoT data, and run batch jobs on devices. The use of Remote IoT device SSH not only ensures secure communication but also simplifies the process of managing IoT devices from afar. Together, the Raspberry Pi and SSH form a powerful combination for remote IoT monitoring. SSH is the Secure Shell protocol, and there is a range of SSH tooling. This article will delve into the intricacies of using SSH with IoT devices, providing practical insights and actionable tips for effective implementation. Throughout this article, we will delve into the technical aspects of setting up remote IoT monitoring using SSH on a Raspberry Pi. By leveraging SSH Remote IoT on Raspberry Pi, you can perform tasks such as file transfers, remote command execution, and system monitoring without the need for physical access to the device.
Step-by-Step Guide to Implementing SSH on Your Raspberry Pi
Setting up SSH on your Raspberry Pi is the foundation for remote access and control. This process, although straightforward, demands careful attention to detail to ensure both functionality and security. Heres a step-by-step guide to help you get started.
- Enable SSH on Your Raspberry Pi: By default, SSH may not be enabled on your Raspberry Pi. You can enable it using the Raspberry Pi configuration tool (raspi-config) or through the command line. If using the command line, run `sudo raspi-config`. Navigate to "Interface Options," then select "SSH," and choose "Enable." Reboot your Raspberry Pi after making these changes.
- Determine Your Raspberry Pis IP Address: You'll need the IP address of your Raspberry Pi to connect to it remotely. You can find this by logging into your Raspberry Pi locally and running the command `ifconfig` or `ip addr`. Alternatively, check your router's connected devices list.
- Connect to Your Raspberry Pi Using SSH: From your computer, use an SSH client (e.g., PuTTY on Windows, or the built-in terminal on macOS and Linux) to connect to your Raspberry Pi. Use the command `ssh pi@`. Replace `` with the actual IP address. The default username is "pi," and the default password is "raspberry." For security reasons, it's highly recommended to change the default password immediately.
- Change the Default Password: Once youve successfully connected via SSH, it's imperative to change the default password. Use the command `passwd` and follow the prompts to set a new, strong password.
- Enhance Security (Optional but Recommended): Further enhance security by disabling password-based authentication and enabling key-based authentication. This is done by generating an SSH key pair on your local computer and copying the public key to your Raspberry Pi. This eliminates the need for a password. Configure your SSH server on the Raspberry Pi to only accept connections with keys.
- Configure Firewall (If Necessary): If you have a firewall enabled on your network, make sure it allows inbound connections on port 22 (the default SSH port).
- Test Your Connection: After configuring SSH, test the connection by logging out and attempting to log back in. This verifies that your settings are working correctly.
Implementing these steps will allow you to securely access and manage your Raspberry Pi remotely. Remember to regularly update your Raspberry Pi's software and firmware to keep it secure.
Advanced SSH Techniques for IoT Management
Once you've established a basic SSH connection, there are several advanced techniques that can significantly enhance your IoT management capabilities. These techniques can streamline tasks, improve security, and automate many common operations.
- SSH Key-Based Authentication: As previously mentioned, key-based authentication is a crucial security measure. It eliminates the need for passwords, which are vulnerable to brute-force attacks. Generate an SSH key pair (public and private) on your local machine using the command `ssh-keygen`. Then, copy the public key to your Raspberry Pi using `ssh-copy-id pi@`. You can then disable password authentication in the SSH configuration file (`/etc/ssh/sshd_config`).
- SSH Tunnels: SSH tunnels allow you to securely forward network traffic through an SSH connection. This is particularly useful for accessing services that are not directly exposed to the internet. There are several types of tunnels:
- Local Port Forwarding: Allows you to access a service on the Raspberry Pi from your local machine (e.g., accessing a web server running on the Pi). Use the command `ssh -L :: pi@`.
- Remote Port Forwarding: Allows you to access a service on your local machine from the Raspberry Pi (e.g., accessing a database on your local network).
- Dynamic Port Forwarding: Creates a SOCKS proxy server on your local machine, which you can configure applications to use for all their network traffic.
- File Transfers with `scp` and `sftp`: `scp` (secure copy) and `sftp` (SSH File Transfer Protocol) are command-line tools for securely transferring files to and from your Raspberry Pi.
- scp: Simplest to use. Example: `scp pi@:`.
- sftp: Provides a more interactive experience with commands like `get`, `put`, `ls`, and `cd`.
- Remote Command Execution: Use the `ssh` command to execute commands on your Raspberry Pi remotely without establishing an interactive session. For example, `ssh pi@ 'sudo apt update && sudo apt upgrade -y'` will update and upgrade the Pi's software.
- Automating Tasks with SSH: Use SSH in scripts to automate various tasks, such as backups, system monitoring, or configuration updates. This can be particularly powerful for managing multiple devices.
- Monitoring with SSH: Use SSH to access system monitoring tools such as `top`, `htop`, or `iotop` to monitor CPU usage, memory consumption, and disk I/O. You can also use scripts to automatically collect and analyze this data.
- Reverse SSH Tunnels: Often used when your Raspberry Pi is behind a firewall or on a network where you dont have direct access. The Raspberry Pi initiates an SSH connection to a server you control that is accessible from the outside.
Troubleshooting Common SSH Issues
Even with a solid understanding of SSH, you may encounter some common issues. Here's how to address some frequent problems:
- Connection Refused: If you can't connect to your Raspberry Pi, ensure that SSH is enabled, the IP address is correct, and the Raspberry Pi is connected to the network. Also, verify that your firewall is not blocking incoming connections on port 22.
- Authentication Failures: Make sure you are using the correct username and password. If you're using key-based authentication, verify that your public key is correctly added to the `authorized_keys` file on the Raspberry Pi. Check for typos in the key file.
- Firewall Issues: Check your local firewall (e.g., `ufw` on the Raspberry Pi) to ensure port 22 is open. Also, verify that your network's firewall is not blocking SSH traffic.
- Incorrect IP Address: Always confirm the IP address of your Raspberry Pi. It might have changed due to DHCP. Consider setting a static IP address to avoid confusion.
- Keyboard Layout Issues: If you're having trouble typing the correct characters, ensure that the keyboard layout on your local machine matches the layout expected by the Raspberry Pi.
- SSH Server Not Running: On the Raspberry Pi, check the status of the SSH server using `sudo systemctl status ssh`. If it's not running, start it with `sudo systemctl start ssh` and enable it to start at boot using `sudo systemctl enable ssh`.
Choosing the Right Tools for Remote IoT Monitoring
Selecting the appropriate tools can significantly enhance the efficiency and effectiveness of your remote IoT monitoring setup. There are several options, each with its own strengths. Heres a look at some of the key considerations.
- SSH Clients: For accessing the Raspberry Pi via SSH, you'll need an SSH client.
- PuTTY (Windows): A free and popular SSH client for Windows.
- Terminal (macOS/Linux): Most macOS and Linux systems have built-in terminal applications that can be used for SSH.
- Mobile SSH Clients: Apps like Termius (available on iOS and Android) let you connect to your Pi from your phone or tablet.
- Monitoring Tools:
- Command-Line Tools: `top`, `htop`, and `iotop` are excellent for real-time system monitoring. `df -h` for disk space, `free -m` for memory.
- Web-Based Dashboards: Consider web-based dashboards, like Grafana or Prometheus, can provide an overview of your device's performance, enabling you to visualize metrics.
- File Transfer Tools:
- `scp` and `sftp`: These are the primary tools for securely transferring files via SSH.
- FileZilla (GUI): A popular, free GUI-based FTP/SFTP client, easy to use for file transfers.
- Automation Tools:
- Bash Scripts: Essential for automating tasks.
- Ansible: A powerful automation tool that can manage multiple devices.
- Python and Other Scripting Languages: Useful for writing more complex automation scripts and interacting with your devices' APIs.
- Cloud-Based IoT Platforms:
- SocketXP IoT Cloud Platform: A cloud-based solution which can support a large number of devices per account, offering scalability.
- AWS IoT, Azure IoT Hub, Google Cloud IoT Core: These services are robust platforms for managing IoT devices.
Security Best Practices for Remote IoT Monitoring
Security is paramount in any remote monitoring scenario. Here are security best practices to implement to ensure the safety of your IoT devices.
- Strong Passwords and Key-Based Authentication: Always use strong, unique passwords. Implement key-based authentication to disable password login.
- Regular Software Updates: Keep your operating system and all installed software up to date to patch security vulnerabilities.
- Firewall Configuration: Configure a firewall (e.g., `ufw` on your Raspberry Pi) to allow only necessary traffic. Restrict access to SSH to trusted IP addresses.
- Network Segmentation: If possible, place your IoT devices on a separate network segment to limit the potential impact of a security breach.
- Monitor Logs: Regularly review system logs for suspicious activity. This can help you detect and respond to security threats early.
- Disable Unnecessary Services: Turn off any services that you are not using to reduce the attack surface.
- Two-Factor Authentication (2FA): If supported by your SSH client or a remote access tool, enable 2FA for added security.
- Secure File Transfers: Always use `scp` or `sftp` for file transfers. Never use unencrypted protocols such as FTP.
- Physical Security: Protect your Raspberry Pi and other IoT devices from physical tampering. If your devices are in a public location, consider using a secure enclosure.
- Vulnerability Scanning: Periodically scan your devices for vulnerabilities using tools like `nmap` or vulnerability scanners.

