Remote IoT: Download & Setup Guide For SSH On Raspberry Pi
In an era defined by the relentless expansion of the Internet of Things (IoT), are you equipped to securely manage and control your connected devices from anywhere in the world? Understanding how to leverage free IoT platforms with remote SSH download functionality to establish secure connectivity is not just an advantageit's a necessity.
The allure of the IoT lies in its promise of seamless connectivity and remote access. However, this promise comes with significant security challenges. Traditional methods of remote device management, such as Virtual Private Networks (VPNs) and complex firewall configurations, often prove cumbersome and costly. The solution lies in a streamlined approach, one that prioritizes ease of use without compromising security.
The remote IoT platform, combined with the power of Secure Shell (SSH), offers a compelling solution. SSH, a cryptographic network protocol, provides a secure channel for data communication, remote command execution, and secure network services over an unsecured network. This means you can control and manage your IoT devices remotely, even from distant locations, without the need for complex configurations.
The integration of these technologies unlocks a vast array of possibilities for both personal and professional use. From remotely monitoring home automation systems to managing industrial sensors, the applications are virtually limitless. By embracing this technology, you can take control of your IoT devices, ensuring their security and optimizing their performance.
Setting up a remote IoT platform using SSH on a Raspberry Pi and downloading it for Windows is a powerful way to manage devices remotely. This guide will show you how to download and use a remote IoT platform SSH Raspberry Pi download setup for seamless connectivity and control. Well delve into the best practices for setting up a remote IoT platform with SSH on a Raspberry Pi, focusing on free, Windows-compatible solutions.
With a remote IoT platform, you can eliminate the need for complicated VPN or firewall setups. Install the remote IoT service on any IoT device that uses a TCP/IP stack, and you are ready to go. This article provides a comprehensive understanding of how to use remote IoT platform SSH download Raspberry Pi configurations to elevate your IoT projects.
Let's explore the core concepts and steps involved in creating a secure and efficient remote IoT management system.
Understanding the Core Components
The foundation of a remote IoT platform lies in a few key technologies:
Raspberry Pi: A versatile and affordable single-board computer. It acts as the central hub for managing your IoT devices.
SSH (Secure Shell): A cryptographic network protocol providing a secure connection for remote access and management.
Remote IoT Platform: Software that enables remote access to IoT devices and simplifies management tasks. The remote IoT platform SSH addresses this by offering a free download option for users who want to manage their IoT devices remotely.
TCP/IP Stack: The set of protocols that allow the Raspberry Pi and IoT devices to communicate over a network, including the internet.
The Benefits of Remote IoT Management
The advantages of remote IoT management are numerous, benefiting both individuals and businesses:
Enhanced Security: Secure SSH connections protect your devices from unauthorized access, preventing potential breaches and data compromise.
Simplified Management: Remotely control and configure your devices without needing to be physically present.
Increased Efficiency: Save time and resources by diagnosing and troubleshooting issues remotely.
Cost Savings: Reduce the need for on-site visits and hardware upgrades.
Scalability: Easily manage a growing number of IoT devices from a central location.
Setting Up Your Remote IoT Platform: A Step-by-Step Guide
Here's a detailed guide to setting up a remote IoT platform with SSH on your Raspberry Pi:
Step 1: Hardware and Software Requirements
Before you begin, gather the following:
- Raspberry Pi (any model with network connectivity)
- MicroSD card (8GB or larger)
- Power supply for the Raspberry Pi
- Network cable or Wi-Fi connection
- Windows computer
You'll also need the following software:
- Raspberry Pi OS (formerly Raspbian)
- SSH client (PuTTY is a popular choice for Windows)
Step 2: Installing Raspberry Pi OS
Flash the Raspberry Pi OS onto your microSD card. You can download the Raspberry Pi Imager from the official Raspberry Pi website. Insert the microSD card into your computer and follow these steps:
- Open the Raspberry Pi Imager.
- Choose your operating system (Raspberry Pi OS).
- Select your microSD card.
- Click "Write" to flash the image.
Step 3: Configuring SSH on the Raspberry Pi
By default, SSH is often disabled on newer Raspberry Pi OS versions for security reasons. Enable it during the initial setup. There are multiple ways to achieve this:
- Using Raspberry Pi Imager:
- Open the Raspberry Pi Imager.
- Click on the settings (gear) icon before writing.
- Enable SSH and set a username and password (or use key-based authentication for enhanced security).
- Write the image to the SD card.
- Manually (If SSH is disabled):
- Boot the Raspberry Pi with the microSD card.
- Connect a monitor, keyboard, and mouse to the Raspberry Pi.
- Log in with the default credentials (username: pi, password: raspberry if you haven't changed them).
- Open the terminal and run: sudo raspi-config
- Navigate to "Interface Options" > "SSH" and enable SSH.
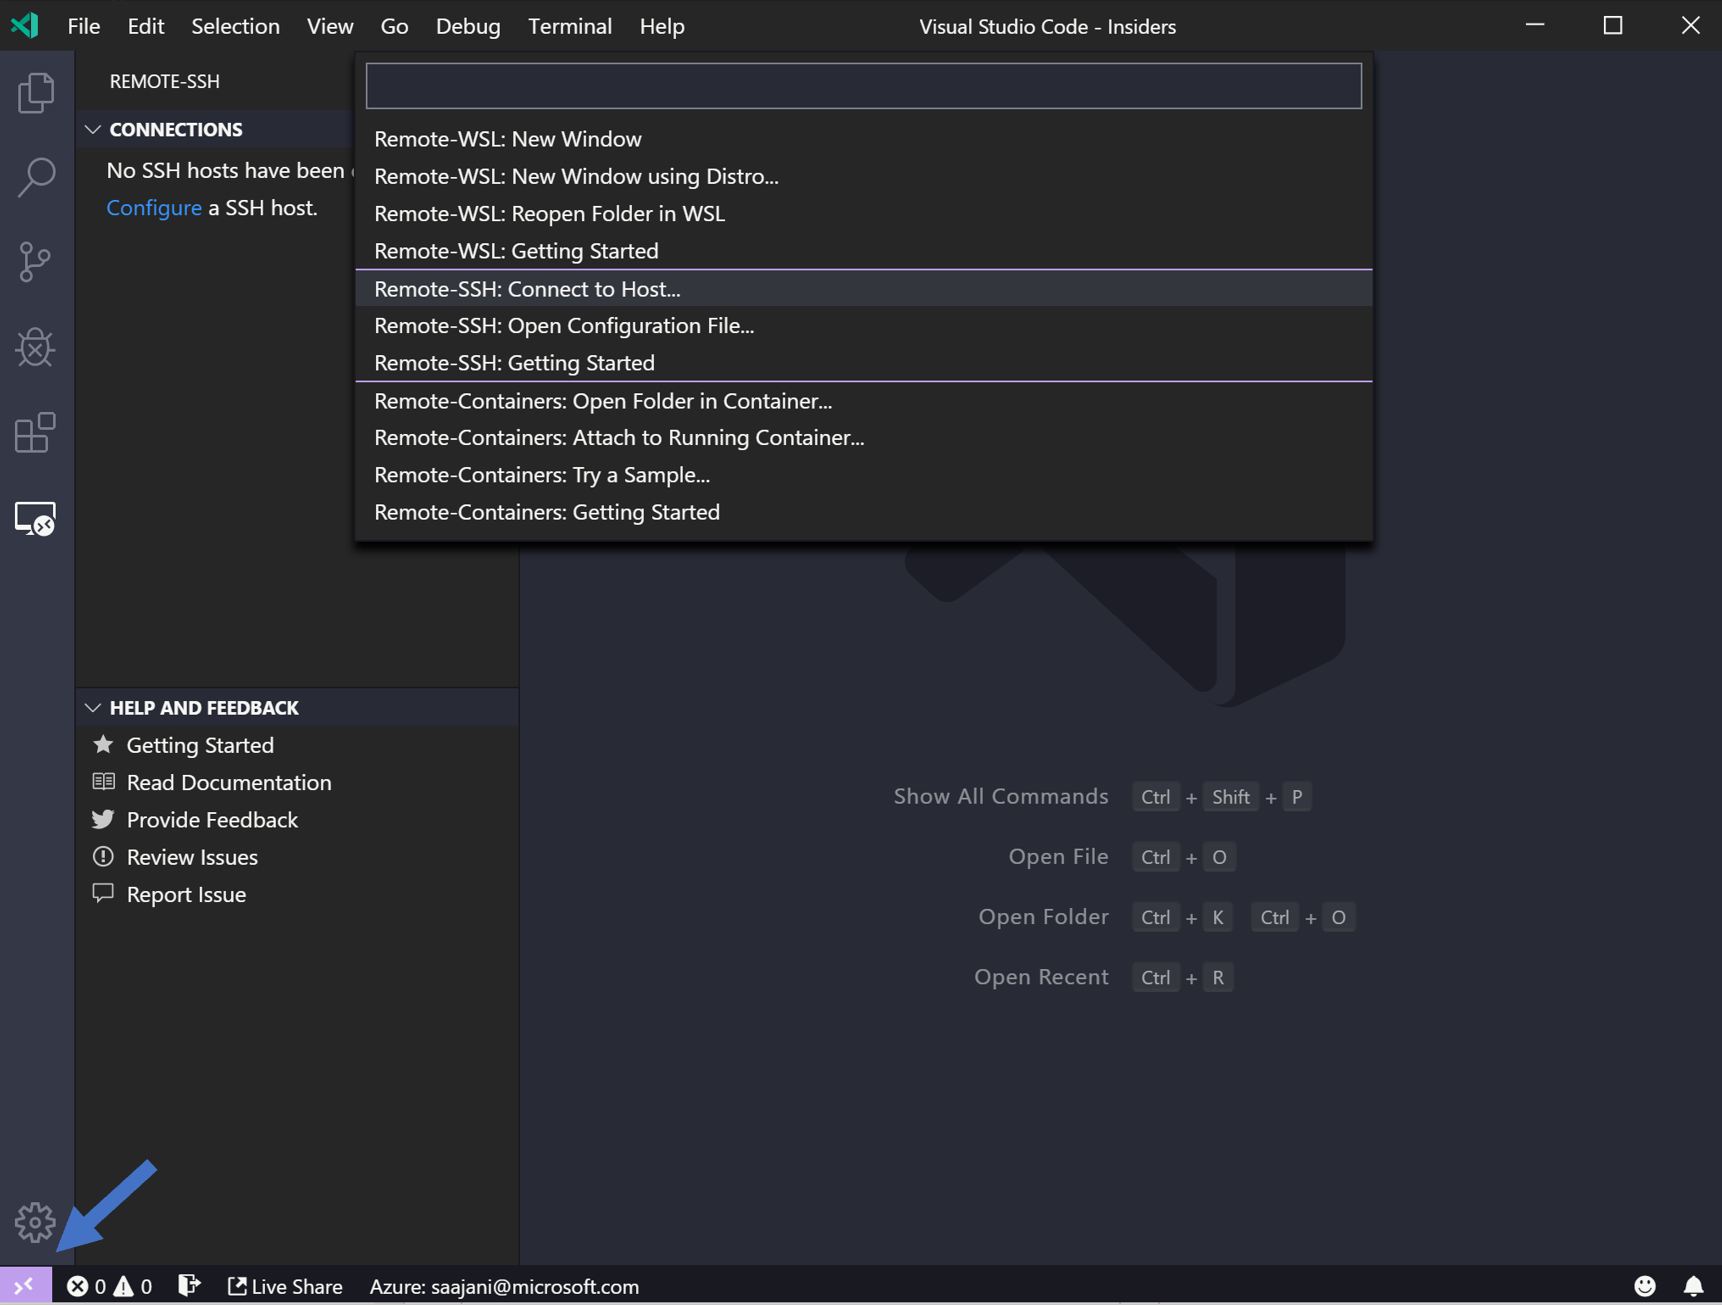
Step 4: Connecting to Your Raspberry Pi via SSH
Once SSH is enabled, you can connect to your Raspberry Pi from your Windows computer. Install PuTTY if you haven't already, and follow these steps:
- Open PuTTY.
- Enter the IP address of your Raspberry Pi in the "Host Name (or IP address)" field. You can find the IP address on your routers administration page or by connecting a monitor to your Raspberry Pi and using the ifconfig command in the terminal.
- Ensure the connection type is "SSH".
- Click "Open".
- When prompted, enter the username and password you set up for your Raspberry Pi.
You are now connected to your Raspberry Pi via SSH. You can run commands, manage files, and configure the Raspberry Pi remotely.
Step 5: Installing the Remote IoT Platform
The process of installing a remote IoT platform will vary depending on the platform you choose. Many platforms offer free downloads and are compatible with Windows. Generally, you would:
- Research and select a remote IoT platform that suits your needs. Several open-source and free options are available.
- Download the platform software from the provider's website.
- Follow the platform's installation instructions, which may involve installing software on both your Raspberry Pi and your Windows computer.
Step 6: Configuring the Remote IoT Platform
Configure the platform according to its documentation. This often includes:
- Setting up device connections.
- Configuring remote access settings.
- Setting up security protocols, such as user authentication and data encryption.
Step 7: Connecting Your IoT Devices
The next step involves integrating your IoT devices with the remote IoT platform. The process will vary depending on the types of devices and the platform you're using.
- Most platforms provide libraries or APIs to interact with various IoT devices.
- You may need to install these libraries on your Raspberry Pi.
- Then, you can use the platform to send commands, receive data, and monitor your devices remotely.
Securing Your Remote IoT Platform
Security is paramount when setting up a remote IoT platform. Implementing these security measures is essential:
- Strong Passwords: Use strong, unique passwords for both your Raspberry Pi and the IoT platform. Change the default passwords.
- Two-Factor Authentication (2FA): Enable 2FA on your platform if it's supported. This adds an extra layer of security by requiring a second verification method.
- Regular Updates: Keep the operating system, SSH, and the IoT platform software up to date with the latest security patches.
- Firewall: Configure a firewall on your Raspberry Pi to restrict incoming and outgoing network traffic.
- Key-Based Authentication: Replace password authentication with SSH key-based authentication for a more secure login process.
- Network Segmentation: If possible, segment your network to isolate your IoT devices from the rest of your network.
- Encryption: Ensure that data transmitted between your devices and the platform is encrypted. Most platforms provide this feature.
- Monitor Logs: Regularly monitor system logs for suspicious activity.
Troubleshooting Common Issues
As you set up your remote IoT platform, you might encounter some common problems.
- Connectivity Issues: Ensure your Raspberry Pi has a stable internet connection and that your router is properly configured.
- SSH Connection Refused: Verify that SSH is enabled on the Raspberry Pi and that the SSH service is running. Check the firewall settings.
- Incorrect IP Address: Double-check the IP address you're using to connect to the Raspberry Pi. If you are using a dynamic IP address, consider setting up a static IP address or using a dynamic DNS service.
- Platform-Specific Issues: Consult the documentation and support resources for your chosen IoT platform.
Alternative Solutions and Platforms
Numerous platforms offer solutions to manage and control IoT devices remotely.
Here are a few examples:
- OpenRemote: A popular open-source platform with extensive features for remote device management.
- ThingsBoard: Another open-source IoT platform with data visualization and device management capabilities.
- Remote.it: A platform that provides secure remote access to devices, including SSH access.
- BalenaCloud: A platform for building, deploying, and managing applications on IoT devices.
- PlatformIO: An open-source ecosystem for IoT development.
When choosing a platform, consider your specific requirements, technical expertise, and budget. Some platforms offer free tiers or open-source versions.
Further Exploration: Beyond the Basics
Once you have a basic remote IoT platform set up, consider exploring advanced features and configurations:
Automated Tasks: Utilize the Raspberry Pi's capabilities to automate tasks based on data received from your IoT devices.
Data Visualization: Use data visualization tools to display real-time data from your devices.
Alerting: Set up alerts to notify you of critical events or changes in device status.
Integration with Cloud Services: Integrate your platform with cloud services to store and process data.
Understanding the 1965 Zodiac Animal Insights
While this guide focuses on the technical aspects of remote IoT platforms, it's worth noting that the 1965 zodiac animal sign is associated with certain traits and characteristics. This context can offer insights into the way individuals might approach technology and innovation.
For example, people born in the Year of the Snake (1965) are often perceived as intelligent, wise, and intuitive. These qualities could translate into a natural aptitude for understanding complex technologies and finding creative solutions to problems. This is, however, just an interesting coincidence and has no direct bearing on the technical instructions provided above.
In conclusion
Setting up a remote IoT platform with SSH on a Raspberry Pi opens a world of possibilities for managing your IoT devices. By following the steps outlined in this guide, you can create a secure, flexible, and efficient system for remote control and monitoring. Remember to prioritize security, stay updated with the latest technologies, and explore the countless opportunities for innovation that remote IoT platforms provide. With free tools available on Windows, and the knowledge of the techniques explained above, you can create a powerful and flexible system that meets your needs. The ability to securely connect and manage devices through remote SSH has become increasingly important for businesses and individuals alike. Embrace the potential of remote access and take control of your connected world.


, are you equipped to securely manage and control your connected devices from anywh)